A timeline is the backbone of any project. In a field as diverse as project management, with dozens of methodologies and hundreds of industries, there are just a few tasks that are common to every enterprise. Timelines are undoubtedly one of them. Creating a project management timeline is a fundamental skill which every project manager must fully grasp early in their career. Whether you are a professional, working towards a bachelor’s degree in project management, or are already on your way to a master’s, you’ll be making frequent use of project management timelines in both class and field work.
This guide will take you through the history of project management timelines, explain why you need one, introduce some different options for generating one, and end with 8 steps you can take right now to create a project management timeline that will be realistic and effective. Along the way, we’ll offer up proven tips for getting the most out of the process, and steer you to free templates and resources that will get you started creating a project management timeline, hassle-free.
Origins of Project Management Timelines
While projects as far back as the Great Pyramids have do doubt required management and oversight, the formal discipline of project management, is generally said to date back to two important early-20th century figures: Henri Fayol and Henry Gantt. Fayol was the director of a French mining company, and laid out a theory of business administration, “Fayolism,” which delineated the functions of management (Planning, Organizing, Staffing, Directing, Controlling). Gantt was an American management consultant, and pioneered the use of visual charts for engineering projects. The “Gantt chart,” created in 1910, was revolutionary, and found application in World War I and the building of the Hoover Dam. Incredibly, the Gantt chart has stood for over 100 years as the gold standard in project management timelines, though a few modern twists have increased its flexibility and range.
Importance of Project Management Timelines
Every project must pass through four life cycle phases: Initiation, Planning, Execution, and Closure. While it’s difficult to point to any one phase as the most important, the Planning phase is probably the time when project managers can be most influential in shaping the future of a project. It as it this point that their research, assessments and projections will take form. Creating a project management timeline that’s realistic, clear, and comprehensive will go a long way towards starting off a project on the right track. Managing that timeline during the Execution phase, of course, is another important factor.
Tip: When planning, think of time as both a goal and a resource. You want to meet (or beat!) your deadline for delivery. Along the way, you’ll have a limited quantity of time to assign to each task. Start with big chunks of time for big tasks, then break down each into smaller pieces.
A great timeline will accomplish several goals:
- Lay out clear expectations in terms of completion dates, including start/end dates and milestones
- Keep all stakeholders on the same page and hold team members accountable
- Delineate goals and priorities
- Include provisions for changes to the schedule, such as delays
Gantt Charts

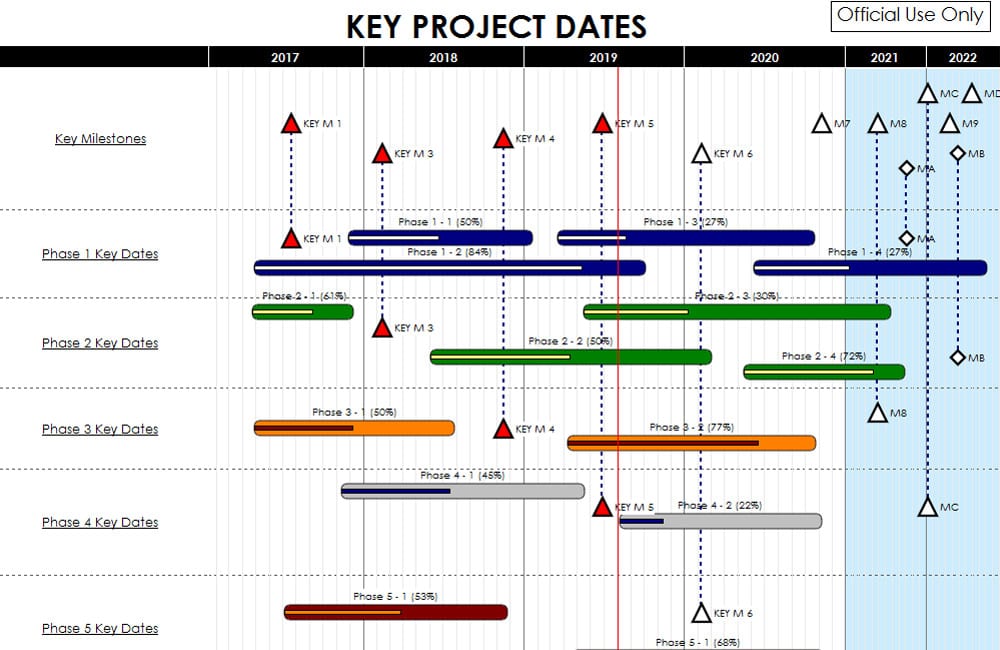
Gantt charts may have evolved from the first timelines drawn on paper over 100 years ago, but the essential elements remain the same: cascading horizontal bars represent tasks to be completed over the course of a project between the start- and end-dates. The enduring power of this type of chart is its clear visual nature; it’s easy to see what has to happen when, and how long each task ought to take. Tasks that need to be completed simultaneously can be represented, as can both short-and long-term tasks. You can see task dependencies, scheduling constraints, duration of each task and percent complete at a glance.
Options for Creating a Gantt Chart
In the days of pen and paper, you’d be required to create your Gantt chart by hand, and a new chart had to be drawn if the schedule changed in any way after the initial plan was completed. Today, technology has made editing a Gantt chart a relatively simple affair, as is sharing it with the rest of the team.
You have several options when it comes to creating a project management timeline with a Gantt chart.
- D.I.Y. You can build your own custom project management timeline from scratch using a step-by-step processes. There are tutorials to build Gantt charts in Google Sheets, Excel, or PowerPoint. This process is fairly straightforward and free, but has a bit of a learning curve. Any subsequent changes to the chart must be made by hand in the program, and shared with the team.
- Templates You can take advantage of free Gantt chart templates on a number of sites, such as Office Timeline or Team Gantt or Studio Binder. These ready-made templates are fast and free, but may not be a perfect fit for your particular project.
- Software Project management software is a popular solution for generating Gantt charts. This option requires less time investment than creating your own chart by hand, and results in a responsive chart which can be easily altered and shared with stakeholders.
Some of the most popular software programs are Zoho, Wrike, and Clarizen of which include useful additional tools for building charts and managing resources. Most popular software programs are paid, costing around $15-$50 per user per month, though there are a few open source programs, such as taiga.io and 2-Plan.
8 Steps to Creating a Project Management Timeline
However you choose to make it, simply generating a Gantt chart won’t get you anywhere if you don’t take the proper steps to make it fit the Big Picture for your project. A common mistake made by early-career project managers is to creating a project management timeline that’s elegant and detailed, but which fails to fit the project’s scope, fails to adapt to change, and fails to set realistic milestones and dependencies. To ensure you’re timeline is not only well-designed but well-thought-out, you’ll need to take the following eight steps.
Step 1: Create a Scope Statement
Have you ever walked into the kitchen to fix dinner, only to find yourself also packing lunches, making grocery lists, and wiping down counters? If you’re wasting resources pursuing any features outside of your original goal, you’ve fallen victim to one of the most common problems in the field of project management: scope creep.
Scope Creep (also known as “kitchen sink syndrome”) refers to the tendency of projects to incorporate tangentially related tasks and new, unauthorized goals. The solution is simple: a well-defined, agreed-upon, and well-enforced Scope Statement. The Project Management Institute cited “lack of clarity and depth to the original specification document,” as the first cause of scope creep. Before you can create a project management timeline, it’s imperative that you have clear project parameters defined and understood by all stakeholders.
Creating a Scope Statement is an involved process unto itself, and there are several resources like the Project Management Institute’s guide which can help you get started. Suffice to say that your final document should define the following in concrete, measurable terms:
- project justification
- a description of the work
- the objective to be delivered
- constraints
- acceptance criteria
- assumptions and conditions
- project exclusions
Tip: Once finished, share your Scope Statement with all stakeholders, altering it based on feedback if need be. Everyone must fully agree on exactly what is to be done (and what is not to be done) before you can determine how best to do it.
Step 2: Create a Work Breakdown Structure

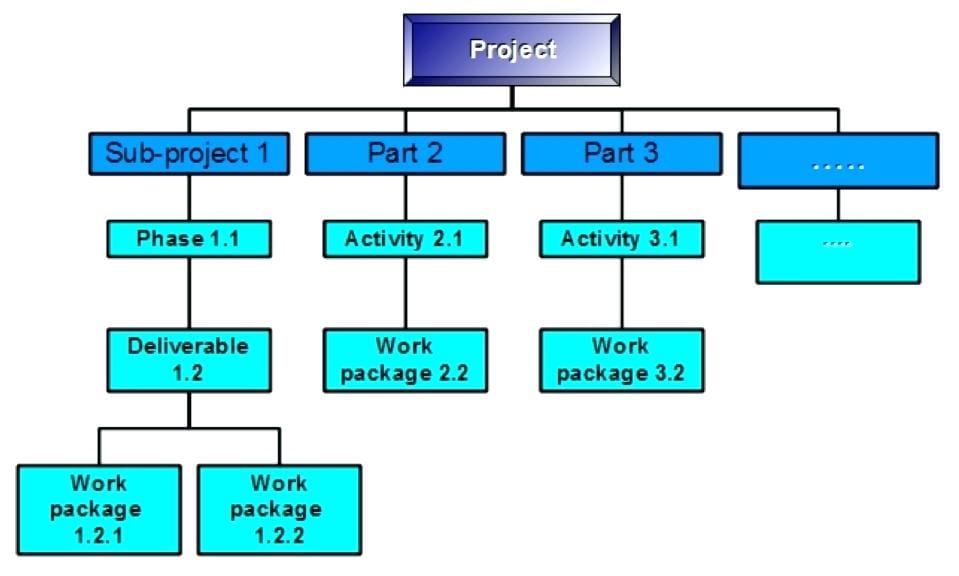
Using the goals defined in the Scope Statement, break down your deliverable(s) into component parts. Rather than assigning time frames to these, or even considering the tasks involved, you’ll simply be systematically determining what parts make up each end product. From there, you will subdivide, repeating until you’ve reached a sufficiently detailed level of “work packages.” For complex projects, this process is both challenging and absolutely critical. Again, the PMI offers some in-depth guides to creating an effective WBS. There are any number of free templates for WBS charts available online, and the majority of project management software programs will include a tool for creating WBS charts as well.
Tip: Follow the Rule of Mutual Exclusivity and the 100% Rule. The Rule of Mutual Exclusivity states that there should be no overlap between work packages, to avoid wasted effort. The 100% Rule states that that the sum of all resources in the WBS, should add up to 100%, with no shortfalls or additional work.
Step 3: Define Tasks
Now is the time to think about tasks. Consider each “work package” (the smallest individual components of the overall project, determined by the WBS). What actual work needs to take place in order to complete this mini-goal? What will be the baseline and what will be object of each? Again, stick to concrete and measurable terms. Write a to-do list for work package. Anticipate a certain level of built-in uncertainty; some tasks involve only known processes, while those that involve any level of research or collaboration can turn out to require extra steps.
Tip: Stick to the appropriate level of granularity. How much specificity and detail is required? Too much will bog down a simple project, too little risks allowing a complex project to run off course.
Step 4: Determine Dependencies

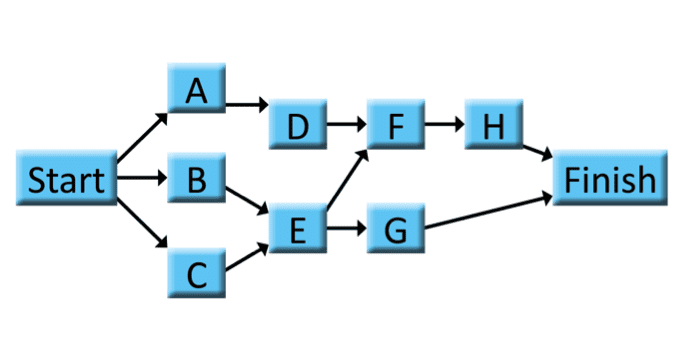
Dependencies are those tasks which cannot be started before the last is completed. In building a house, for instance, you’ll have to level the ground before pouring the foundation. While this is straightforward in sequential projects, many complex projects have interdependent components that require mapping. You may find during this process that certain tasks can run simultaneously or overlap, or discover that the anticipated order of certain tasks needs to be reversed.
Dependencies come in three flavors: mandatory (those inherent sequences dictated by the nature of the work being done), discretionary (those reflecting a preferred but not required task flow), and external (those dictated by non-project activities). Needles to say, you’ll have the most wiggle room in terms of discretionary dependencies, so use these to your advantage. When constructing creating a project management timeline, discretionary dependencies allow you to make adjustments without endangering the mandatory sequence of critical tasks.
A Project Network Diagram, or Flow Diagram, may be useful in defining and visualizing task dependences within a project. A quick Google search will turn up a number of free Project Network Diagram templates, and any management software program can be expected to include the option to create your own.
Tip: Think of dependencies in terms of handoffs. What will need to be handed off from one person or team to another before they can begin work?
Step 5: Set Milestones
In Gantt Charts, milestones are marked by an individual point, usually a diamond or triangle. Unlike tasks, milestones have a set date but do not have any duration at all. Rather, they signify a fixed point in the project, like an anchor, which serves to show forward momentum and as a check on progress. Milestones may be significant events (such as a product roll-out) or arbitrary points (such as a designated date to check the budget).
Milestones are a way of monitoring your project’s progress. If you meeting several consecutive milestones ahead of schedule, you can probably shorten your project management timeline. Fall behind, and you’ll know immediately that you’ve got a problem with delays. It’s especially important to set milestones as a way to break up longer tasks or chains of taskswhich will take a long time to bear fruit. Milestones are also useful for stakeholder communication. Clients may not understand what’s happening behind the scenes, and milestones are a great way to share progress before there’s anything to show for it in terms of product.
Tip: Milestones motivate. There’s a reason that race courses include markers for every mile- it’s easier to keep up your energy when you can see how far you’ve come. Treat milestones as achievements, spur a burst of team activity towards these mini-goals.
Step 6: Allot Time to Tasks
Before you can get started creating a project management timeline, you’ll need to identify the duration of each task. In your Gantt chart, this will be represented by the length of each task bar, while the bar’s start and end points show when that block of time will take place.
In this phase, a common mistake made by early-career project managers is to overestimate the speed with which a team can complete tasks. Consider all the time, resources and work required for each task, as well as how many and which staff will be performing each. Use past projects as a guide in determining the duration. Solicit input from staff to develop realistic expectations. Be aware of limiting factors; holidays or simultaneous projects, for instance, will impact your team’s available hours.
Tip: Depending on the type of project you’re working on, you may wish to build in some time buffers when creating a project management timeline. A time cushion- particularly around points of uncertainty or risk- can prevent you from missing milestones.
Step 7: Create and Manage Your Project Management Timeline Chart
You’re now fully armed with all the information you need to create a realistic, comprehensive, achievable, and clear timeline. You’re ready to create a chart, whether from scratch, using a template, or through a project management software program. Once it’s complete, and all stakeholders have approved it, you’ll be ready to launch your project.
As you create your Gantt chart, consider the following:
- Will all team members have access to the same chart? Or will I have one version for clients, one for staff, one for management etc.?
- How much detail should I include? Should I create a streamlined version in addition to one with more complete information?
- Is my chart easy for stakeholders without a background in project management to read and interpret?
- Is my chart easy to edit and flexible enough to accommodate changes?
Tip: Have a master plan. If your project is complex, you’re best bet is creating a project management timeline for yourself that includes multiple layers of comprehensive information, then creating versions for each department or party that shows only the information and milestones germane to them. This will keep everyone focused and on the same page for the relevant points.
Wait, you’re not finished yet! All too often, project managers, especially those just starting out, create a beautiful timeline, only to sit back and expect the project to conform to it. In the real world, projects never adhere completely to projections, and any changes- from personnel turnover to newly available resources- will require you to make changes to your project management timeline. Whether this is a minor tweak or a major overhaul to the time frame and parameters, you’ll need to adjust your chart to reflect it and share the changes with all stakeholders.
With forethought, methodical planning and a few savvy tricks, you can create a project management timeline that’s realistic, comprehensive, clear and- most importantly- will drive your project’s success.
